The Link post format allows you to have a post that points to another site.
Create Link (Backend)
To create a link using backend editor, please do as follows:
- Go to the WP Dashboard › Posts page
- Click the Add new button
- Fill in the post title
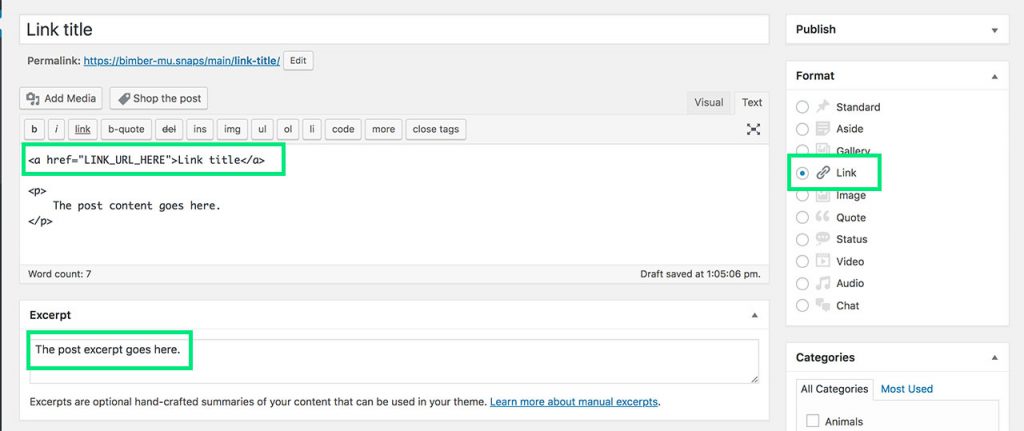
- Now you have to add an HTML link tag ‹a› to the post content (screen). The href attribute defines the link target URL
- After the HTML link tag, you can add any content you want. It will be used as a post summary, on archive listings
- Set the post format to Link (screen)
- Provide the post excerpt without the link tag (screen).
Until you override the post except with your social share plugin settings (e.g from Mashshare or Easy Social Share Buttons), the post excerpt will be used as a social media description while sharing on Facebook, Twitter, etc. Feel free to change the post excerpt to adjust the description. - Publish
Create Link (Frontend)
Requirements
To create the Link post format on the frontend, you will have to use the frontend uploader powered by the Snax plugin.
The Link format allows your visitors to submit external page links. The Snax tries to simplify the process using Open Graph (if supported) to automatically fetch link title, description and featured image.
To use the automatic data fetching, make sure that the below options are enabled on your PHP server:
- allow_url_fopen
- file_get_contents
If you don’t know how to check it, please contact your hosting admin.
Activation
To activate and set up the Link format, please do as follows:
- Go to the WP Dashboard › Settings › Snax › General section
- Please ensure that the Link format is checked
- Switch to the Formats tab and choose Links
- Adjust format settings (required fields, featured media visibility)
- Save changes
To create a link using the frontend uploader, please do as follows:
- Go to your Frontend Submission page (WP Dashboard › Settings › Snax › Pages › Frontend Submission › View)
- Choose the Link format
- Fill an external page URL, for example:
https://bimber.bringthepixel.com/main/this-santa-really-can-tell-how-to-drink-and-hack-your-hangover/ - If the page supports the Open Graph protocol, a page title, description and featured image will be fetched automatically (screen)
- The description is also set as a post excerpt and will be used while sharing on Facebook, Twitter, etc

- If, for a variety of reasons, page meta tags are not accessible you will be notified about it. Fill the missing data manually.
- Publish
Link Icon
To show Link format icon on a post featured image on listings, please check the option WP Dashboard › Appearance › Customize › Posts › Link Post Format › Show Featured Image icon
Link Single Page
When a user clicks on a link (from any archive collection), the link can be opened directly (using one of the opening methods, see below) or the user can be redirected to the link single page. You can freely modify that page, in the same way as you edit other posts.
When a user clicks the external link on that page, the link also will be opened based on the selected opening method (see below).
Enable page
To allow users to visit a link single page, please go to the WP Dashboard › Appearance › Customize › Posts › Link Post Format section and change the Has a single page? option to yes.
Button label
To change the Visit Direct Link button label, please visit the WP Dashboard › Appearance › Customize › Posts › Link Post Format section and adjust the Button label option.
Link Open Methods
Regardless of whether a link has or has not its single page, external links can be opened:
- in a new window
- in the same window
- using landing page – user is redirected to the special page with counter (see below)
To set the default link opening method, please go to the WP Dashboard › Appearance › Customize › Posts › Link Post Format section and change the Open method value.
Set Up Landing Page
Instead of allowing users to leave your site immediately after clicking the post that is an external link, you can forward them to your landing page (screen below). On that page, you can place some ads or whatever you like.

To enabled the landing page for all “external” posts (post format set to the “Link”), please do as follows:
- Go to the WP Dashboard › Pages page
- Click the Add new button
- Fill a page title e.g. Exit link landing page
- Leave the content empty
- Publish page
- Now, go to the WP Dashboard › Appearance › Customize panel
- Switch to the Posts › Link Post Format section (screen)
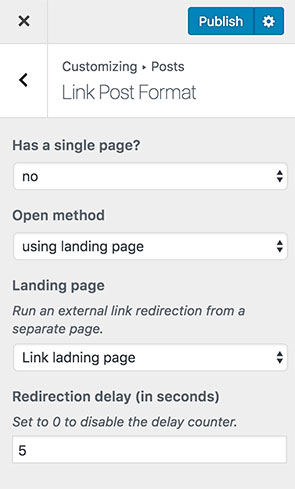
- Open or close a link single page using the Has a single page? option
- Choose the using landing page open method
- Set the Landing page to the previously created page Exit link landing page
- Adjust the delay time
- Publish
- Now, when you click any of link posts (e.g. on homepage), you should be redirected to the Link landing page
Count views
When user clicks a link (regardless of the opening method and a single page accessibility) the link views counter will be incremented.
If a link has a single page, its views will be counted when user visits that single page.
If a link has no a single page, its views will be counted when user is redirected to a target link location. E.g. when you use the “Landing page” method,
the views counter will be updated when the Redirection Counter goes to 0 seconds and redirection will be triggered.
Redirection counter location
Optionally, you can adjust the landing page content by adding some extra info for your visitors. For that, you probably will need to change the location of the redirection counter (Redirecting … in 5 seconds on screen).
You can do that by placing the quick tag
‹!--bimber-link-landing-page-content--›between other elements on the page. If you don’t add this quick tag to the
page content, the counter will be added at the end of the page.
Duplicates Checker
Every submitted link is checked against duplication. If a link with the same url already exists, the link submission is cancelled.
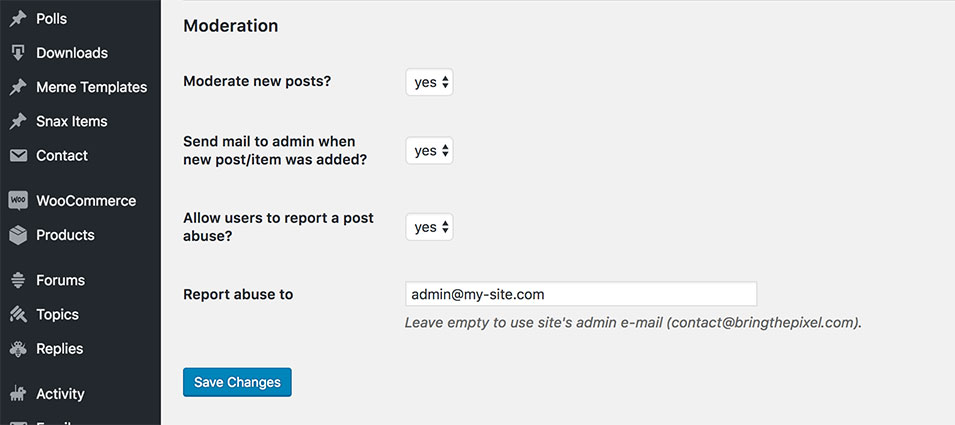
Moderation
If a user finds that a link violates site’s rules, he can report it sending mail to site’s owner.

To turn on/off moderation and set the recipient’s e-mail address, please go to the WP Dashboard › Settings › Snax › Moderation.