Showcase your latest Instagram posts.

Requirements
To show Instagram posts, you will need:
- The G1 Socials plugin activated
- A Facebook Developer Account. Instagram is owned by Facebook and now Instagram API is managed by Facebook
- An Instagram Account with media
Enable
To enable the Instagram module, please go to WP Dashboard › Settings › G1 Socials › Instagram page and check the Enabled box.
Setup
To display your Instagram posts on your site, you have to create an Instagram application and connect it with the site. Please follow these steps:
- Go to https://developers.facebook.com/,
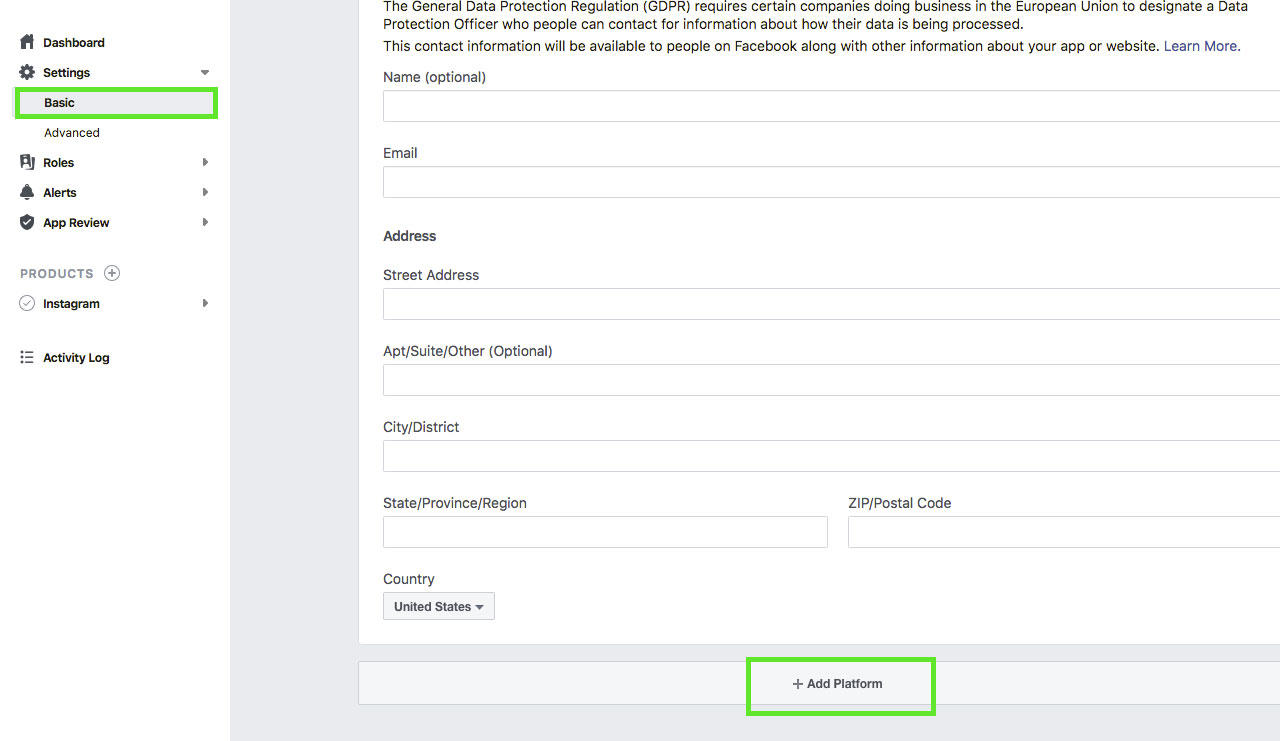
click My Apps, and create a new app. Once you have created the app and are in the App Dashboard, navigate to Settings > Basic,
scroll the bottom of page, and click Add Platform.
- Choose Website, add your website’s URL, and save your changes. You can change the platform later
if you wish, but for this tutorial, use Website - Click Products, locate the Instagram product and click Set Up to add it to your app

- Click Basic Display, scroll to the bottom of the page, then click Create New App

- In the form that appears, fill in:
- Display Name. Enter the name of the Facebook app you just created
- Valid OAuth Redirect URIs. Read below from where you can get it
- Deauthorize Callback URL. Copy here the Valid OAuth Redirect URIs value
- Data Deletion Request Callback URL. Copy here the Valid OAuth Redirect URIs value
- App Review for Instagram Basic Display. Read below when you need to send your app for a review
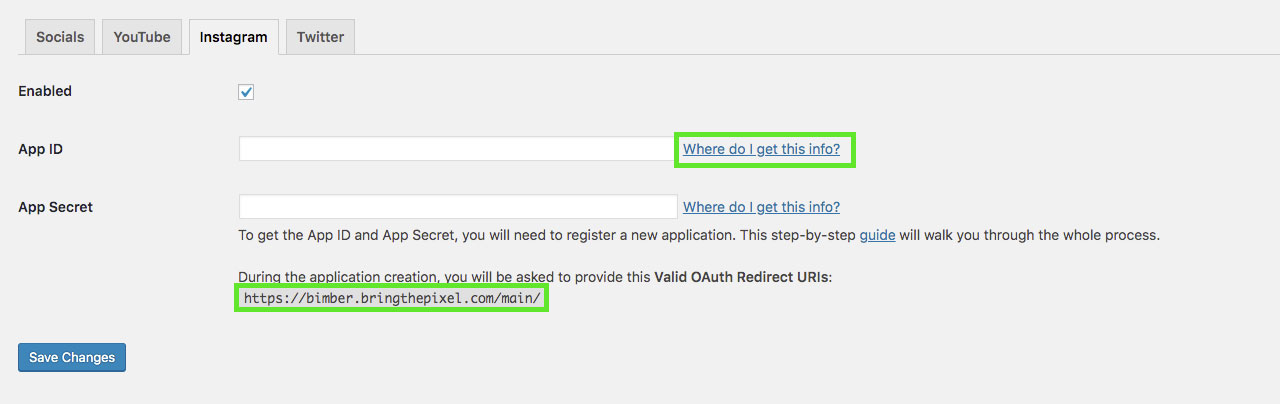
- To get Valid OAuth Redirect URIs, please return back to your site and go to
WP admin panel › Settings › G1 Socials › Instagram page - Next to App ID field, click Where do I get this info? link
- You should see Valid OAuth Redirect URI
- Copy the URL and enter it in the Instagram application Valid OAuth Redirect URIs field (point 5.2 above)
- Save changes
- Once you have finished, copy Instagram App ID and Instagram App Secret
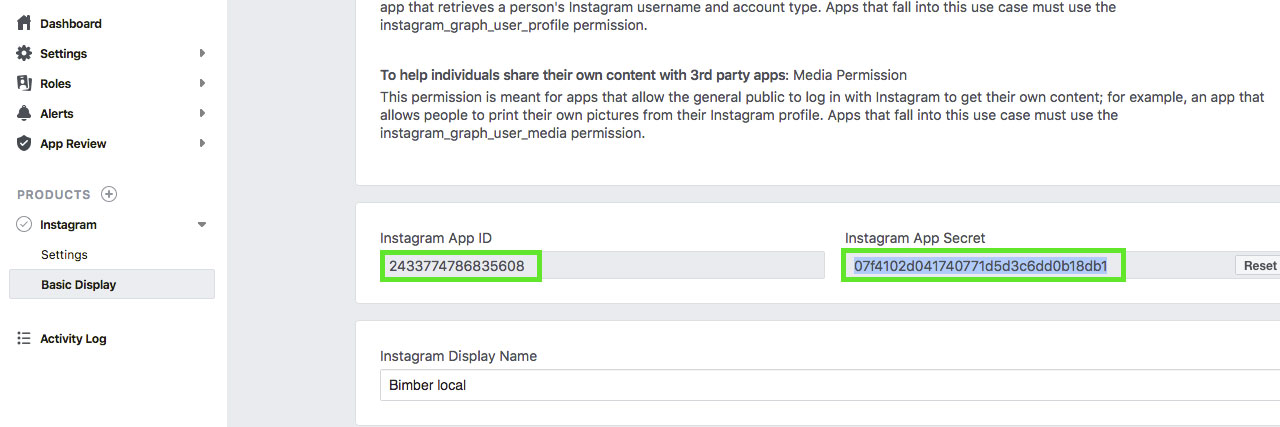
- Go back to WP Dashboard › Settings › G1 Socials › Instagram page
and paste them into App ID and App Secret fields - Save changes
- You should now see some additional fields (screen below)
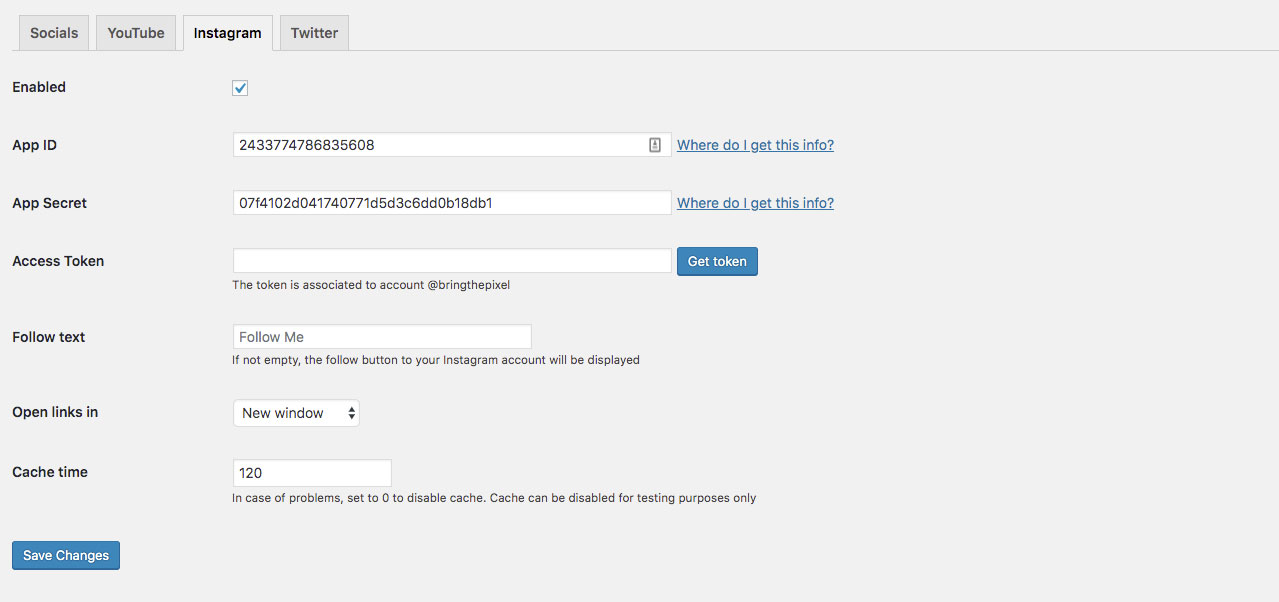
- Click Get token button
- If you are not logged in on to your Instagram account, you will be asked to log in
- Then, Instagram will ask you to Authorize access your newly created application
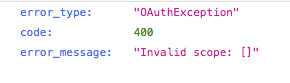
- If you followed the previous steps and your application is configured correctly, you should be redirected back to your Instagram settings
and the token should be filled in. Below Access Token completed field, you should see information what account the token is associated with - Otherwise, you will see the image below. It means that your Instagram application is still in development and your Instagram user’s account has not been authorized to access it.
To solve the problem, please read App Review section below.
App Review
To use your Instagram application, it has to be in Live Mode or your Instagram user’s account has to be added to it as a test user.
Switch To Live Mode
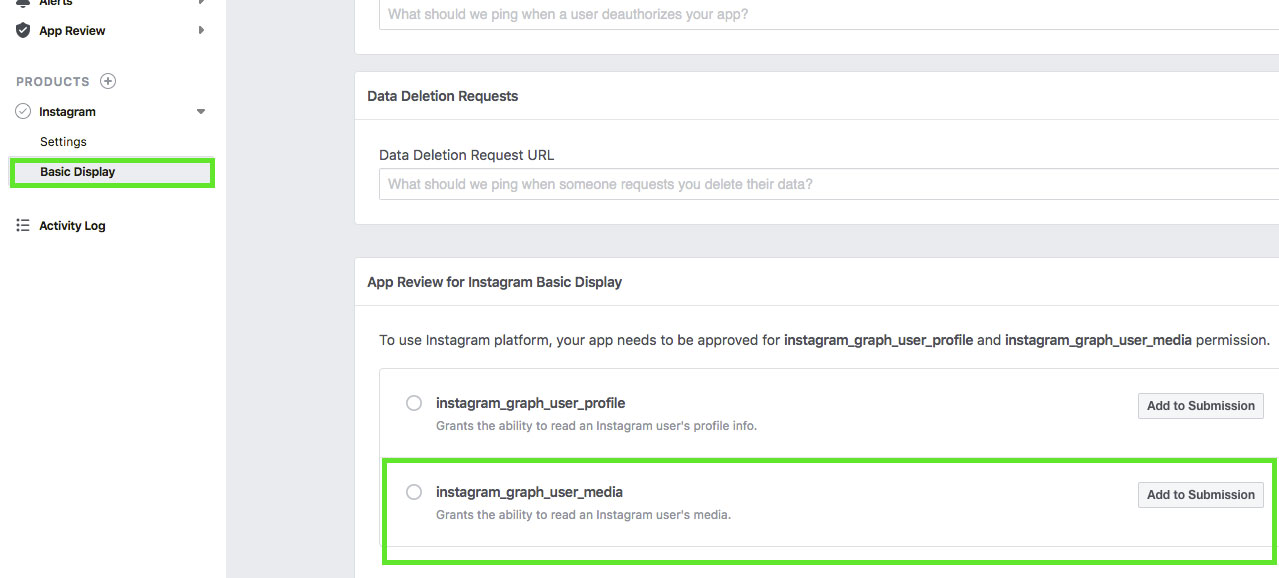
To go Live with your app, you have to submit it for a review. Go back to your Facebook Developer Account, then Instagram > Basic Display, and choose instagram_graph_user_media submission option.
Add a Test User
Your application doesn’t have to be Live to allow you test it. All you need is to add a test user. To do so, please do as follows:
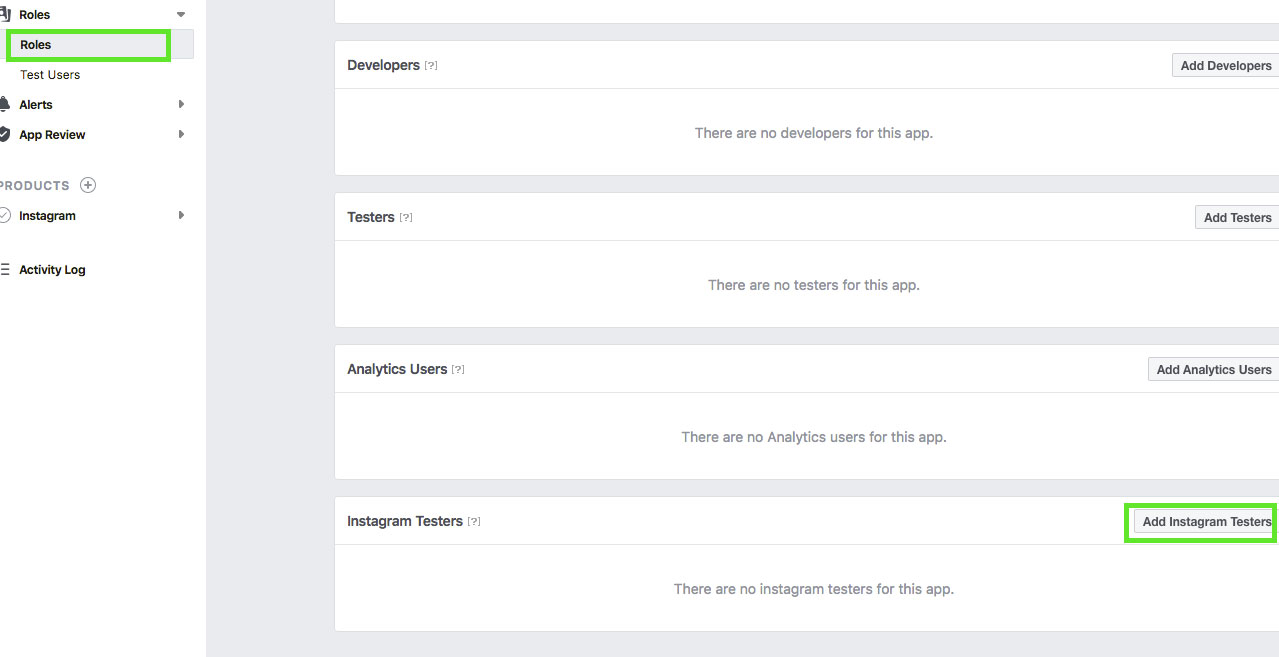
- Go back to your Facebook Developer Account
- Navigate to Roles > Roles and scroll down to the Instagram Testers section.
Click Add Instagram Testers and enter your Instagram account’s username and send the invitation.
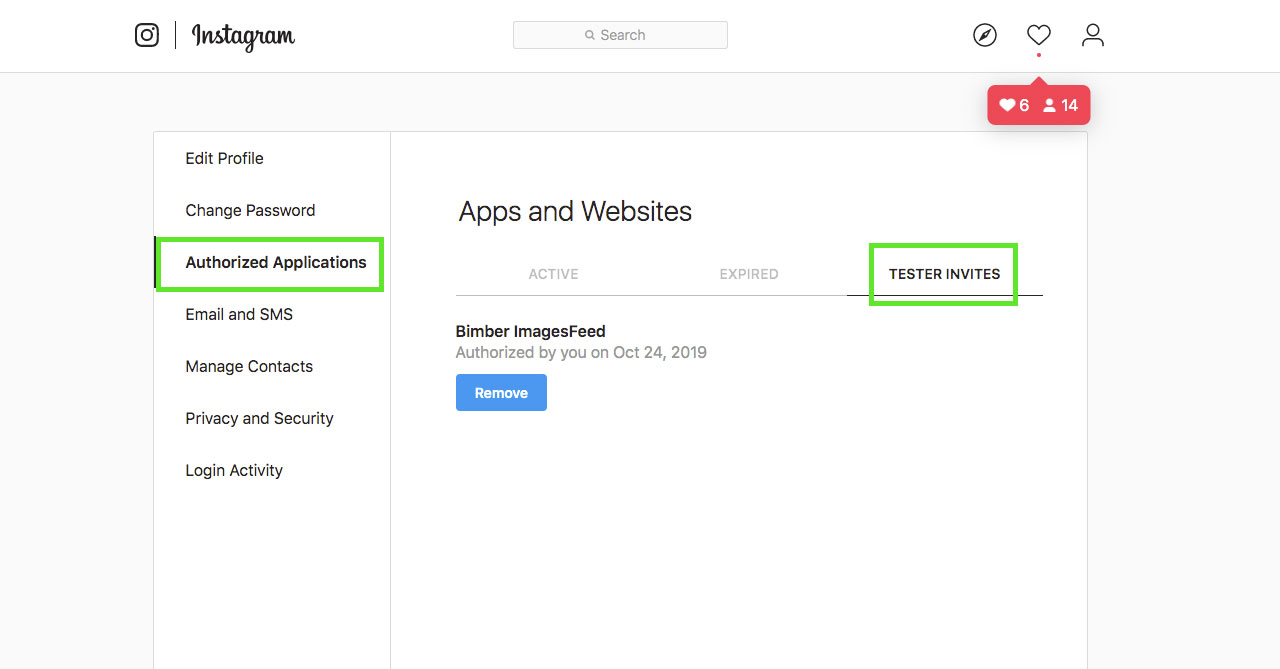
- Go to your Instagram Account
- Click Edit Profile
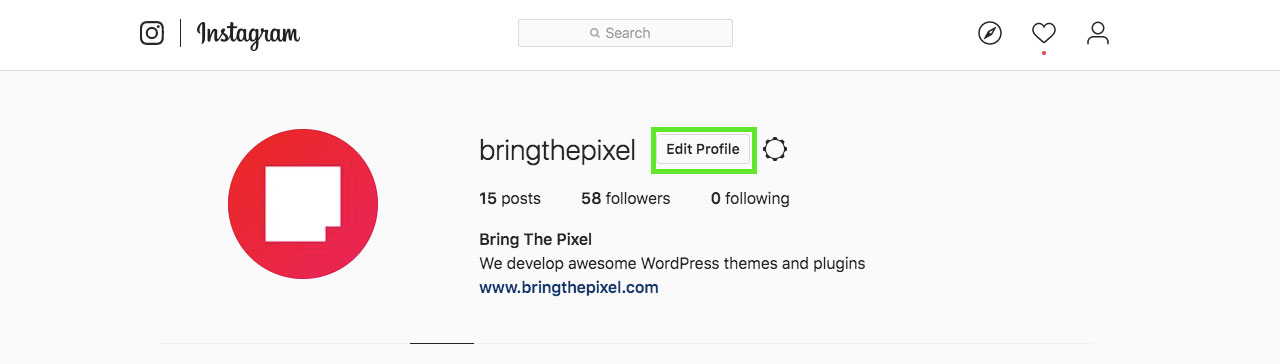
- Navigate to Authorized Applications
- Choose Tester Invites and accept the invitation
- Your Instagram account is now eligible to be accessed by your Facebook app while it is in Development Mode
Display
You can display Instagram posts in these locations:
- Sidebar
- Before Main Collection
- Before Footer
Sidebar
For this location, please refer to the Instagram Widget page.
Before Main Collection
To display the Instagram posts before the main posts feed, please follow these steps:
- Go to WordPress Admin › Appearance › Customize page
- Open Home › Before Main Collection panel
- Select Show Instagram box
- Publish
Before Footer
To display the Instagram posts before the footer, please follow these steps:
- Go to WordPress Admin › Appearance › Customize page
- Open Footer › Modules panel
- Select Show Instagram box
- Adjust display settings: color scheme and background
- Select Instagram – single row box if you prefer to display only one line of posts
- Publish
Cache
Recommended setup
The cache time should be always set to value greater that 0 (default value is 120) to minimize the number of queries sent to the Instagram servers.
When results are cached, a page loading time is not affected by the time the widget has to wait for Instagram to respond.
Disable cache
In some cases, it is useful to disable the cache. When something goes wrong and results are not loaded or are wrong, you may want to disable it and force it to fetch data from Instagram again. To disable the cache, set its time to 0 in the WordPress Admin › Settings › G1 Socials › Instagram page. Remember to restore the value after testing.
Important!
Be aware that, when the cache is disabled, each time you reload a page, the widget has to send a new request to Instagram and wait for its reply. This can lead to a blockade. Instagram can block your site if you send too many requests at the time. Keep that in mind and disable cache only when needed and with caution.